Image Source: premiumgrassblades.com
Can I Staple Down My Gym Turf? The Truth Revealed
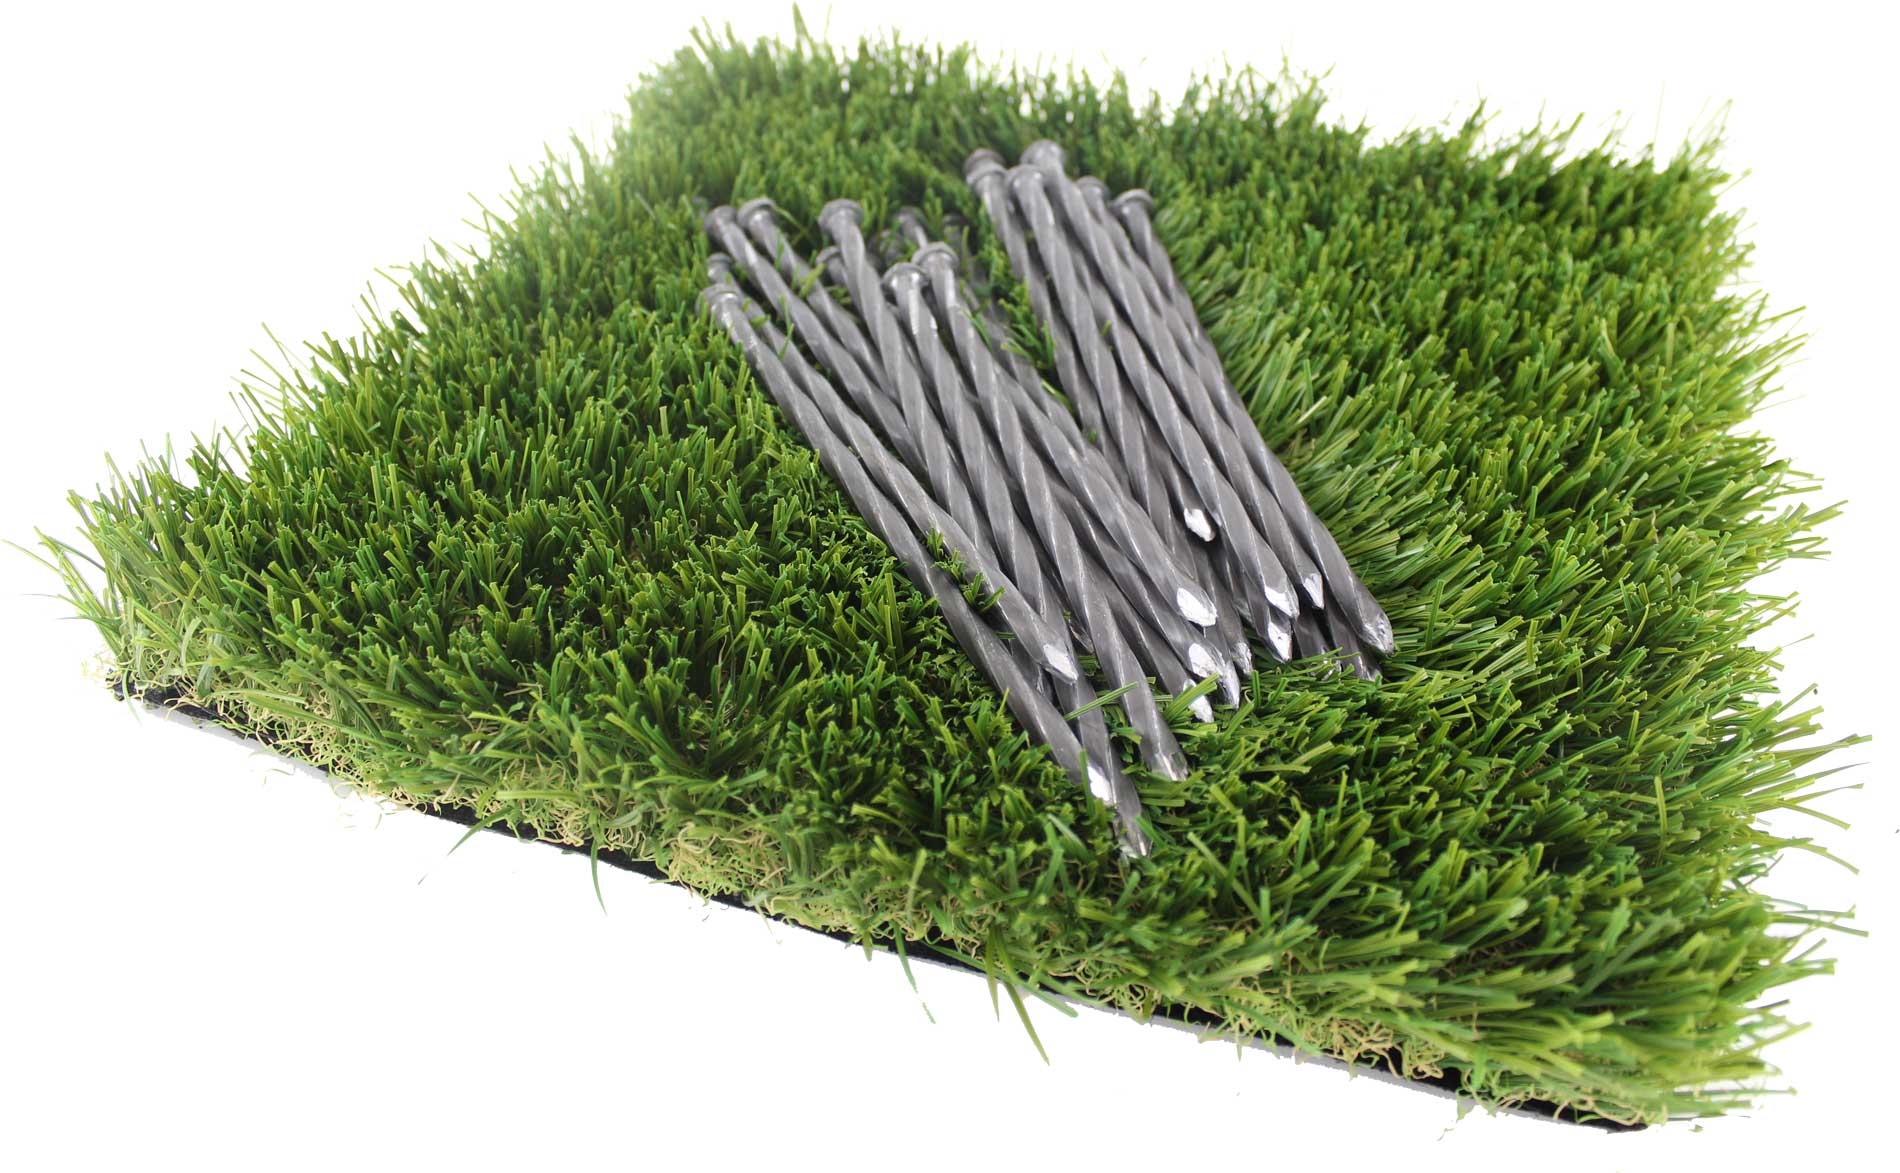
Let’s get straight to the point: Can you staple down your gym turf? While you could technically use staples, it is generally not recommended or the proper way to secure gym turf, especially in areas with heavy use. Using staples often leads to problems like damage to the turf, potential safety hazards, and poor long-term performance. There are much better, more reliable methods for securing indoor athletic turf that professionals and DIYers should use instead.
Why Stapling Gym Turf Is a Bad Idea
Staples might seem like a quick fix, but they create many issues when used on gym turf. This type of flooring needs to be flat, secure, and durable. Staples work against these goals.
Damage to the Turf Material
Gym turf is made of synthetic fibers and a backing material. Staples punch holes through these layers.
* This weakens the turf where the staples are placed.
* Holes can cause tears to start, especially under heavy weights or foot traffic.
* The turf might pull away around the staples, looking messy and wearing out fast.
Safety Concerns on the Floor
A gym floor must be safe. Staples make it unsafe in several ways.
* Staples can come loose over time.
* Loose staples stick up and can trip people.
* They can scratch skin or damage equipment.
* Even staples that stay in place can create tiny bumps that feel uneven underfoot.
Poor Stability and Durability
Staples don’t hold turf down as evenly or as strongly as other methods.
* They only grip in small spots.
* The turf can shift or ripple between the staples.
* This makes the floor feel less stable during workouts.
* The entire floor won’t last as long because the turf is not properly supported everywhere.
Looks and Finish
A gym floor should look good too. Stapling usually doesn’t provide a clean finish.
* Staple lines can be visible.
* The turf edges might not lay flat.
* It can give the floor an amateur or unfinished look.
* Getting a smooth, professional appearance is hard with staples.
Because of these major drawbacks, exploring proper gym turf installation methods is essential for a safe, durable, and good-looking gym floor.
Different Gym Turf Installation Methods
Builders and installers use proven ways to put down gym turf. These methods provide better hold, safety, and durability than staples. The main ways involve using special adhesives or tapes.
Using Adhesives (Gluing Gym Turf)
Gluing is a very common and effective method. It provides a strong, lasting bond between the turf and the floor below it (the subfloor).
Types of Adhesive Application
There are two main ways to glue gym turf down:
-
Full Spread: You spread adhesive over the entire area of the subfloor where the turf will go.
- This gives maximum hold.
- It stops the turf from moving or shifting at all.
- Best for high-traffic areas or heavy lifting zones.
- Uses more adhesive and takes more time.
-
Perimeter and Seam Gluing: You only apply adhesive around the edges of the room and along the seams where turf pieces join.
- Uses less adhesive.
- Faster to install.
- Good for lighter use areas or if you might need to remove the turf later.
- The center of the turf piece is not glued down, but the edges are held firmly.
Best Adhesive for Gym Turf
Choosing the right glue is important. Not all glues work with all turf types or subfloors.
* Polyurethane Adhesives: These are very strong and flexible. They work well on concrete and wood. They handle moisture well, which is good if the subfloor has minor moisture issues.
* Acrylic Adhesives: Often water-based. Easier to clean up. Work well on porous surfaces like concrete or wood. Might not be as strong as polyurethane for heavy use.
* Specific Turf Adhesives: Many turf companies sell their own glues. These are made to work perfectly with their turf products. Always check the turf maker’s recommendation first.
Factors to Consider When Choosing Glue:
* Subfloor Type: Concrete, wood, etc., need different glue types.
* Moisture: Does the subfloor have moisture issues? You need a moisture-resistant glue.
* Traffic/Use: Heavy use needs stronger glue (like full spread polyurethane).
* Ventilation: Some glues have strong fumes. Make sure you have fresh air.
Using the right adhesive ensures the turf stays in place and lasts a long time.
Using Tape (Taping Gym Turf Seams)
Tape is another way to secure gym turf, often used with or instead of glue. It’s mainly used to join pieces of turf together securely.
Seam Tape Application
- You place a strong, double-sided tape on the subfloor along the line where two pieces of turf will meet.
- You then lay the edges of the two turf pieces onto the tape.
- This creates a strong bond at the seam, stopping the edges from lifting.
Types of Tape
- Seaming Tape: Specifically made for joining turf seams. It’s usually very strong and weather-resistant (even for indoor use, strength matters).
- Double-Sided Carpet Tape: Can sometimes work for lighter applications, but check its strength and how well it sticks to both the subfloor and turf backing.
Tape is often used for securing indoor athletic turf in home gyms or areas with less extreme use. It’s less permanent than full-spread glue and can be part of DIY gym turf flooring projects. However, for large gyms or heavy lifting zones, tape alone might not be enough. It’s often combined with perimeter gluing for extra hold.
Combination Methods
Sometimes, installers use both glue and tape.
* They might glue the perimeter and all seams.
* They might use tape for seams and glue for edges around obstacles.
* This combines the strong hold of glue with the quickness of tape for seams.
These standard gym turf installation methods are far better than stapling because they provide continuous or near-continuous hold, distribute stress evenly, and create a smooth, safe surface.
Installing Gym Turf on Different Subfloors
The type of floor underneath your turf matters a lot. Concrete and wood are common subfloors, and each has its own needs.
Installing Gym Turf on Concrete
Concrete is a solid base, but it can cause problems if not prepared right.
Concrete Preparation
- Cleanliness: The concrete must be very clean. Remove all dirt, dust, grease, paint, or old adhesive. Sweeping is not enough; you’ll likely need to scrape and maybe even grind the surface.
- Smoothness: The concrete needs to be flat and smooth. Any bumps or dips will show through the turf. You might need to fill cracks or level uneven areas using a self-leveling compound.
- Moisture Testing: Concrete can hold and release moisture. This moisture can break down adhesives or cause mold. You must test the concrete for moisture levels.
- Simple test: Tape a piece of plastic sheeting (about 2×2 feet) tightly to the concrete floor. Leave it for 24 hours. If you see water drops on the underside of the plastic or the concrete looks darker, you have a moisture problem.
- Better test: Use a concrete moisture meter or perform calcium chloride tests.
- Moisture Mitigation: If moisture is an issue, you need a plan.
- Use a moisture barrier coating on the concrete.
- Choose a moisture-resistant adhesive (like some polyurethanes).
- Address the source of the moisture if possible (e.g., poor drainage outside).
Laying Turf on Concrete
Once the concrete is prepped:
1. Roll out the turf and let it relax.
2. Cut the pieces to fit the space.
3. Apply the chosen adhesive (full spread or perimeter/seam) using a notched trowel designed for the adhesive.
4. Carefully lay the turf into the wet adhesive.
5. Press the turf down firmly, maybe using a roller, to make sure it contacts the glue everywhere.
6. If using seam tape, apply the tape along the lines before laying the turf pieces.
7. Join the seams carefully, making sure the fibers meet naturally.
Installing gym turf on concrete requires careful surface prep, especially managing moisture, to avoid gym turf installation problems later.
Installing Gym Turf on Wood Subfloor
Wood subfloors (like plywood or OSB) are also common, especially in home gyms. They have different needs than concrete.
Wood Subfloor Preparation
- Cleanliness: Like concrete, the wood must be clean and free of debris.
- Smoothness: Make sure the wood panels are flat. Screw down any loose boards or squeaky spots. The seams between wood panels should be level. You might need to sand down high spots or fill low spots.
- Structure: The wood floor must be strong enough to handle the weight of gym equipment and the impact of activities. Add extra support if needed.
- Moisture/Humidity: Wood reacts to moisture and humidity by expanding and contracting. High humidity can cause wood to swell.
- Ensure the room’s humidity is controlled.
- Allow the wood and turf to sit in the room for a few days before installing. This lets them get used to the room’s conditions.
Laying Turf on Wood
The process is similar to concrete, but the adhesive needs to work with wood.
1. Let turf and wood sit in the room for a few days.
2. Clean and prep the wood surface.
3. Apply an adhesive suited for wood subfloors (polyurethane or acrylic often work well, check manufacturer).
4. Lay the turf into the glue, pressing firmly.
5. Join seams using tape or glue as planned.
Installing gym turf on wood subfloor is often more straightforward than concrete regarding moisture barriers, but you still need to ensure the wood is stable, flat, and clean. Using staples on wood might seem easier, but it still causes the same issues with turf damage and poor hold as on concrete. Proper adhesive or tape is always the better choice.
Doing Your Own DIY Gym Turf Flooring
Many people choose to install gym turf themselves. This can save money but requires careful work and planning. DIY gym turf flooring is possible using the right methods.
Steps for a DIY Install
- Measure Carefully: Measure your space exactly. Account for any odd shapes, pillars, or doorways. Draw a simple plan.
- Order the Right Turf: Choose turf suitable for your gym needs (pile height, density). Order enough turf, adding a little extra for cuts and mistakes (usually 10-15% extra).
- Choose Installation Method & Supplies: Decide if you will glue (full or perimeter/seam) or tape. Buy the correct adhesive or tape for your subfloor and turf. Get a notched trowel (if gluing), a sharp utility knife and blades, measuring tape, a straight edge, gloves, and knee pads.
- Prepare the Subfloor: Clean, flatten, and test for moisture (especially concrete). This is the most critical step to avoid gym turf installation problems.
- Lay Out the Turf: Unroll the turf pieces. Let them sit for 24 hours or more to flatten out. Position them roughly where they will go. Make sure the “grain” or direction of the fibers runs the same way for all pieces for a uniform look.
- Cut the Turf: Use your sharp utility knife and straight edge. Cut from the back of the turf. Be patient and cut carefully along your lines. Cut pieces to fit walls and obstacles, leaving a small gap (about 1/4 inch) around the edges to allow for expansion.
- Secure the Turf:
- If gluing: Fold back a section of turf. Spread the adhesive evenly with the notched trowel. Lay the turf back into the glue and press firmly. Repeat for sections. If doing perimeter/seam, only apply glue there.
- If taping: Apply the double-sided seam tape to the subfloor along the seam line. Lay the edges of the turf pieces onto the tape, pressing down hard.
- Join Seams: Push the edges of the turf pieces together tightly at the seams. Make sure the fibers blend nicely. Roll seams firmly with a heavy roller or walk over them to ensure good contact with glue or tape.
- Trim Edges: Once secured, trim the edges neatly along walls or where it meets other flooring using your utility knife. Tuck edges under baseboards if possible or use transition strips.
- Clean Up: Remove any excess adhesive (clean up spills right away when wet). Vacuum the turf to make the fibers stand up.
Potential DIY Problems
Doing it yourself can lead to issues if you’re not careful.
* Subfloor not prepped: This is number one. If the floor isn’t clean, flat, or dry, the turf won’t stick or will look bad.
* Wrong adhesive/tape: Using the wrong product means the turf won’t stay down.
* Bad seams: Uneven seams look terrible and can be trip hazards.
* Cutting errors: Wasting turf by cutting wrong. Measure twice, cut once!
* Not letting turf relax: Turf won’t lay flat and will be hard to install smoothly.
* Poor ventilation: Some glues have strong fumes. Work in a well-aired space.
Proper planning and following the steps carefully are key to successful DIY gym turf flooring. While it takes more effort than just stapling, the result is a much better and longer-lasting floor.
Alternatives to Stapling Artificial Turf
The best alternatives are the standard methods already discussed: gluing and taping. These are the professional ways of securing indoor athletic turf.
Why Glue and Tape Are Better
- Superior Hold: Adhesives and proper tapes create a continuous or near-continuous bond, holding the turf down across larger areas, not just in tiny spots like staples.
- Increased Durability: The turf is supported evenly, reducing stress points and preventing tears around fasteners. The floor lasts much longer.
- Improved Safety: No sharp points sticking up. A flat, stable surface reduces trip hazards.
- Better Aesthetics: Seams are tight and clean. The surface is smooth and professional-looking.
- Subfloor Integrity: Gluing or taping doesn’t put hundreds or thousands of holes in your subfloor.
Comparing methods, it’s clear that adhesives and tapes are the go-to solutions for gym turf.
| Feature | Stapling | Taping (Seams) | Gluing (Perimeter/Seam) | Gluing (Full Spread) |
|---|---|---|---|---|
| Hold Strength | Poor (spot hold) | Good (at seams) | Good (edges/seams) | Excellent (total area) |
| Durability | Poor (causes tears) | Good | Very Good | Excellent |
| Safety | Poor (staple hazard) | Excellent | Excellent | Excellent |
| Looks | Poor (visible, uneven) | Good (clean seams) | Very Good | Excellent (flat, smooth) |
| Ease of DIY | Appears easy, but results are poor | Relatively Easy | Moderate | More Difficult |
| Subfloor Damage | High (many holes) | Low (tape residue) | Low (glue residue) | High (hard to remove) |
| Cost (Materials) | Low | Moderate | Moderate | High |
| Time to Install | Quick | Quick to moderate | Moderate | Slower |
This table highlights why methods like gluing and taping are preferred over stapling for gym turf. While stapling might seem easy, it fails on key points like durability, safety, and effectiveness.
Grasping Adhesive Types for Gym Turf
Choosing the best adhesive for gym turf depends heavily on the subfloor, moisture levels, and how the area will be used.
Common Adhesive Types
-
Polyurethane Adhesives:
- Often a single-part formula (no mixing).
- Very strong bond.
- Flexible once dry, which helps handle minor movement.
- Good resistance to water and moisture vapor. Crucial for concrete.
- Can have strong fumes; need good air flow.
- Hard to clean up once dry.
-
Acrylic Adhesives:
- Often water-based.
- Easier to apply and clean up (while wet).
- Generally less fumes.
- Bond strength can vary. Less flexible than polyurethane.
- More sensitive to moisture. Needs a very dry subfloor.
- Often a good choice for wood subfloors in climate-controlled spaces.
-
Epoxy Adhesives:
- Usually two parts that you mix.
- Create a very rigid, strong, permanent bond.
- Excellent moisture resistance.
- Can be less forgiving during installation (sets faster).
- Hard to work with and clean up.
- Often used in high-performance or outdoor settings, less common for standard indoor gym turf but very durable.
Selecting the Right Adhesive
- Check the Turf Manufacturer: Always look at the turf company’s instructions. They will recommend specific adhesive types or even brands that work best with their product backing.
- Identify Your Subfloor: Is it concrete or wood? This is the biggest factor.
- Assess Moisture: If concrete shows any sign of moisture, you must use a moisture-resistant adhesive or a moisture barrier first. Polyurethane is usually better here than acrylic.
- Consider Use: Heavy weightlifting areas need a stronger, more durable bond, suggesting full-spread polyurethane or epoxy.
- Think About Future: Do you ever plan to remove the turf? Full-spread glue, especially epoxy, is very hard to remove. Perimeter gluing or taping is easier to lift later.
Using the correct best adhesive for gym turf is vital for a successful installation and avoiding gym turf installation problems. Don’t just grab any glue; make sure it’s right for your specific situation.
Deciphering Seam Taping for Gym Turf
Seam taping is a key part of many gym turf installation methods, especially for joining rolls together neatly and securely.
Types of Seam Tape
- Single-Sided Seaming Tape: Used with liquid adhesive. You lay this tape down on the subfloor along the seam line, then spread liquid glue onto the tape. The turf edges are laid onto the glue-covered tape. The tape acts as a base for the glue and helps prevent the glue from soaking into the subfloor too much.
- Double-Sided Seaming Tape: Has adhesive on both sides. You stick one side to the subfloor along the seam. You then remove the backing from the top side and stick the edges of the two turf pieces to the tape. This is simpler and faster than using liquid glue with tape, but the bond might not be as strong as glue. Look for high-tack, heavy-duty versions specifically for turf or flooring.
How to Tape Seams Effectively
- Prepare the Subfloor: Make sure the subfloor is clean, dry, and flat along the seam line.
- Position the Turf: Lay out the two pieces of turf that will meet at the seam. Line them up carefully, making sure the fibers run the same way. Leave a small gap (maybe 1/8 inch) that you will close when you press them onto the tape.
- Apply the Tape: Starting at one end, unroll the seam tape and stick it precisely along the planned seam line on the subfloor. Make sure it’s straight. Press it down firmly.
- Apply Adhesive (if using single-sided tape): Spread your liquid turf adhesive evenly over the top surface of the single-sided tape using a small notched trowel.
- Join the Turf: Carefully bring the two edges of the turf together over the tape (or glue-covered tape). Press them down firmly onto the adhesive.
- Secure the Seam: Walk along the seam or use a seam roller or heavy object to press the turf edges firmly into the adhesive. This ensures good contact. Check the seam from the top to make sure the edges are tight and the fibers blend.
Taping gym turf seams correctly is vital for a smooth, safe, and attractive finished floor. Poorly taped seams can lift, fray, or become trip hazards.
Preparing the Subfloor: The Foundation of Good Installation
Skipping or rushing subfloor preparation is the most common cause of gym turf installation problems. Proper prep ensures the adhesive or tape works correctly and the turf lays flat and stays put.
Essential Prep Steps
- Clear the Area: Remove all equipment, furniture, and old flooring materials.
- Clean Thoroughly:
- Sweep or vacuum up all loose dirt and dust.
- Scrape off any old paint, glue, or debris.
- For concrete, you might need a degreaser or floor cleaner.
- For wood, simply sweep and maybe lightly sand rough spots.
- The subfloor needs to be spotless for adhesive to stick.
- Check for Flatness:
- Use a long, straight edge (like a 6-foot level). Place it on the floor.
- Look for gaps under the straight edge or high spots.
- Mark any areas that are not flat.
- Fill low spots with a patch or leveling compound (use one suitable for your subfloor). Follow the product instructions carefully.
- Grind down high spots on concrete. Sand down high spots on wood.
- Aim for no more than 1/8 inch variation over 6-10 feet.
- Check for Moisture (Concrete is Key):
- Perform moisture tests as described earlier for concrete.
- Address any moisture issues with a barrier coating or by fixing the source. Do not install turf on wet concrete.
- For wood, ensure the area is not excessively humid.
- Repair Damage: Fill any large cracks or holes in concrete. Secure loose boards or screw down squeaky spots on wood.
Taking the time to prepare the subfloor correctly makes the rest of the gym turf installation methods much easier and guarantees a better final result. It’s the hidden work that makes a professional-looking floor possible.
Cutting and Laying the Turf
Once the subfloor is ready, you can start working with the turf itself.
Cutting the Turf to Size
- Sharp Knife: Always use a very sharp utility knife with new blades. Keep extra blades handy as turf dulls them fast. A dull blade makes cutting hard and results in messy edges.
- Cut from the Back: Flip the turf over so the backing is facing up.
- Use a Straight Edge: Lay a long, sturdy straight edge (metal is best) along your cut line.
- Score and Cut: Apply firm, even pressure. Score the backing first, then make multiple passes with the knife to cut all the way through. Do not try to cut through in one pass, especially thick turf.
- Cutting Around Shapes: For curves or complex shapes, make a template out of paper or cardboard first, then trace it onto the turf backing. Cut carefully.
Laying Out the Turf Pieces
- Let it Relax: After unrolling, let the turf sit for at least 24 hours in the installation area. This lets it flatten out and prevents wrinkles or shrinking after installation.
- Follow the Grain: Artificial turf fibers lean slightly in one direction. Make sure all your turf pieces are laid with the fibers leaning the same way. If you mix directions, the turf will look like different colors or textures.
- Position Carefully: Place the large pieces first, positioning them to minimize waste and tricky cuts. Leave a small gap (about 1/4 inch) around walls and fixed objects. This gap allows for slight expansion in different temperatures and helps with trimming later.
Cutting accurately and laying out thoughtfully makes securing indoor athletic turf much simpler and gives a better finish.
Securing the Turf: The Main Event
This is where you actually fix the turf to the subfloor using your chosen method (glue or tape).
Gluing Steps
- Mix Adhesive (if needed): Some adhesives (like 2-part epoxies) need mixing. Follow the product directions exactly.
- Fold Back Turf: Fold back about half of the first piece of turf.
- Apply Adhesive: Use the correct notched trowel for your adhesive (the notches control the glue thickness). Hold the trowel at a consistent angle (usually 45-60 degrees) and spread the adhesive evenly over the exposed subfloor. Don’t spread more glue than you can cover within the adhesive’s “open time” (how long it stays sticky before drying). Read the adhesive can!
- Lay Turf into Glue: Carefully unfold the turf and lay it into the wet adhesive. Try not to slide it once it’s down.
- Press Down: Press the turf firmly into the glue. You can walk on it, use a heavy roller, or even a tool called a carpet knee kicker (gently) to push the turf down and outward, making sure it makes full contact with the adhesive.
- Repeat: Fold back the other half of the first piece and repeat the process.
- Work in Sections: Continue gluing and laying turf in manageable sections until all the main pieces are down.
- Glue Edges/Seams: If doing perimeter and seam gluing, only apply glue in those specific areas after the turf is laid out and positioned.
Taping Steps (mainly for seams)
- Lay Turf: Lay out and position all your turf pieces, leaving a slight gap at the seams.
- Apply Tape: Lift the edge of one turf piece along a seam. Apply the double-sided seam tape to the subfloor along the center of the planned seam line. Press tape down firmly.
- Join Seam: Remove the backing from the top of the tape. Carefully bring the edges of the two turf pieces together over the tape. Push them together tightly so the fibers meet, and press the edges down onto the tape.
- Secure Seam: Walk along the seam or use a roller to ensure good contact with the tape.
Whether using glue or tape, taking your time and ensuring good contact between the turf backing and the adhesive/tape is key for securing indoor athletic turf effectively.
Finishing Touches and Maintenance
After the main installation, a few final steps complete the job and help your turf last.
Trimming and Edges
- Trim Excess: Once the adhesive has cured (check product instructions for time), trim any excess turf around the edges of the room using your sharp utility knife and a straight edge.
- Around Obstacles: Carefully cut the turf to fit snugly (but not too tight) around any posts, equipment bases, or floor vents.
- Edge Finishing: If you have baseboards, you might be able to tuck the turf edge slightly under them. If not, consider using transition strips or edging trim to create a clean line and prevent the edge from lifting.
Post-Installation Clean Up
- Remove Debris: Sweep or vacuum up any loose turf fibers or installation scraps.
- Clean Adhesive: If you got glue on the turf fibers, clean it up immediately following the adhesive manufacturer’s instructions (before it dries!).
Initial Grooming
- Brush or Vacuum: Use a stiff brush or a vacuum suitable for turf to help the fibers stand up. This makes the turf look its best and helps the seams blend.
Ongoing Maintenance
- Regular Cleaning: Vacuum or sweep regularly to remove dirt and debris that can mat down the fibers.
- Spot Cleaning: Clean spills quickly with mild soap and water.
- Grooming: Periodically brush the turf against the grain to help the fibers stand up, especially in high-traffic areas.
- Check Seams and Edges: Occasionally inspect seams and edges to make sure they are still secure. Address any lifting areas promptly.
Proper finishing and maintenance help keep your DIY gym turf flooring or professionally installed turf looking good and performing well for years, avoiding future gym turf installation problems.
Summarizing the Best Approach
So, can you staple down your gym turf? The answer is a clear “no” if you want a durable, safe, and professional-looking floor. While simple, stapling creates too many risks and weaknesses in the installation.
The truth is, effective securing indoor athletic turf relies on proper gym turf installation methods like gluing and taping.
* Adhesives (like polyurethane or acrylic) provide a strong, widespread bond, especially when doing a full spread or perimeter glue. Choosing the best adhesive for gym turf means considering your subfloor type (concrete vs. wood) and moisture levels.
* Taping gym turf seams using strong double-sided tape is excellent for joining pieces neatly and is often used with perimeter gluing.
Both methods require careful subfloor preparation – cleaning, leveling, and moisture testing are vital steps that prevent most gym turf installation problems. Whether you’re doing DIY gym turf flooring or hiring a pro, following these steps for cutting, laying, and gluing gym turf or taping gym turf seams will give you a much better result than trying to use staples.
Think of it this way: you’re building a floor that will handle heavy weights, quick movements, and lots of foot traffic. You need a securing method that matches that demand. Staples just aren’t up to the task. Using proper adhesives or tapes ensures your gym turf is a safe, durable, and effective part of your workout space for a long time. Look into alternatives to stapling artificial turf, and you’ll see that glue and tape are the way to go.
Frequently Asked Questions (FAQ)
Is stapling gym turf ever okay?
No, not for gym or athletic use. Staples damage the turf backing, create trip hazards, and don’t hold the turf securely or evenly enough for the demands of a gym environment.
How long does gym turf installation take?
This depends on the size of the area, the installation method (gluing takes longer than taping), and subfloor prep. A small home gym might take one person a weekend. A larger commercial space takes longer and likely needs multiple people.
Can I put gym turf over existing carpet or vinyl flooring?
Generally, no. Gym turf needs a hard, flat, clean subfloor. Carpet is too soft and uneven. Vinyl might not provide a good bonding surface for adhesives and could be hiding subfloor issues. It’s best to remove old flooring down to the concrete or wood subfloor.
What if my concrete floor has moisture issues?
You must address moisture before installing turf. This usually involves applying a concrete moisture barrier coating. Use an adhesive specifically designed for moisture resistance (often polyurethane). Installing over wet concrete will cause the adhesive to fail and could lead to mold or mildew under the turf.
How much space should I leave around the edges?
Leave a small gap, about 1/4 inch, around walls and fixed objects. This allows the turf to expand slightly in different temperatures without buckling. This gap is usually hidden by baseboards or transition strips.
Can I use outdoor artificial turf indoors?
Yes, often. Many artificial turfs can be used indoors or outdoors. Check the product specifications. Indoor turf might have different backing or pile height suitable for indoor activities. Ensure it’s rated for the traffic and use you expect in your gym.
What is the typical lifespan of installed gym turf?
With proper installation and maintenance, indoor gym turf can last 10-15 years or even longer, depending on the quality of the turf and the amount of use. Poor installation (like stapling) or neglecting subfloor prep will significantly reduce its lifespan.