How do you do a burpee exercise? A burpee is a simple exercise where you move from standing to a plank position, back to standing, and sometimes add a jump. It’s a powerful full body workout using just your bodyweight, making it a great bodyweight exercise. Knowing the proper burpee form and burpee technique is key to getting the most burpee workout benefits and avoiding injury. Many people use burpees in HIIT exercises and calisthenics routine plans because they work many muscles worked burpees target.
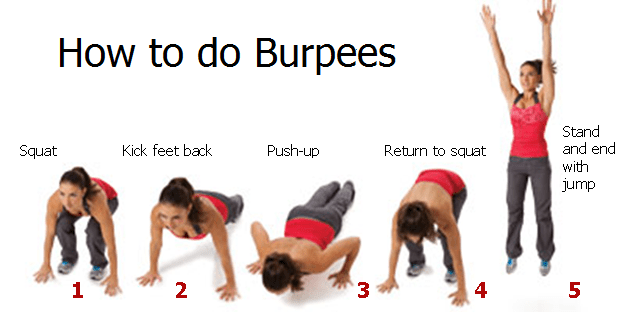
Image Source: www.dangerouslyfit.com.au
What is a Burpee?
A burpee is a complete body movement. It works many parts of your body all at once. Think of it as several moves put into one smooth action. It starts standing, goes down to the floor, and comes back up. It often ends with a jump. This makes it a very effective exercise for getting fit. It uses only your body weight. You don’t need any equipment. This means you can do it almost anywhere. Burpees challenge your heart and lungs. They also build strength in many muscles. Learning how to do it right is important. This article will show you the steps. It will also explain why they are so good for you. We will cover how to do the basic move. We will also look at ways to make it easier or harder.
Grasping the Basic Burpee Technique
Doing a burpee involves moving through several positions. It should feel like one smooth flow when you get better at it. Here are the basic steps for a standard burpee:
- Step 1: Stand Tall. Begin standing with your feet about shoulder width apart. Your arms are down by your sides. Look straight ahead. Get ready to move.
- Step 2: Squat Down. Bend your knees and lower your body into a squat. Put your hands on the floor in front of you. Place them just inside or beside your feet. Your fingers should point forward. Keep your back mostly straight, not rounded.
- Step 3: Kick Back to Plank. From the squat, jump or step your feet back quickly. Land in a plank position. Your body should form a straight line from your head to your heels. Your hands are on the floor under your shoulders. This is like the starting position for a push-up. Keep your core muscles tight.
- Step 4: Do a Push-up (Optional). Some burpees include a push-up here. Lower your chest to the floor by bending your elbows. Push back up to the plank position. If you are new, you can skip this part.
- Step 5: Jump Feet Forward. From the plank, jump or step your feet forward again. Bring them back to the spot where your hands are. You should now be back in the squat position from Step 2.
- Step 6: Stand Up or Jump Up. From the squat, stand up tall. Or, for the full move, jump straight up into the air. If you jump, reach your arms overhead as you jump. Land softly on your feet.
That’s one burpee! You then repeat the steps. Doing several burpees in a row makes for a challenging exercise. This simple set of steps makes a burpee. Following these steps correctly is the burpee technique.
Fathoming Proper Burpee Form
Correct form is crucial for any exercise. This is very true for burpees. Doing them right helps you get the best results. It also keeps you safe. Poor form can lead to injury. Let’s look closely at proper burpee form at each step.
Starting Stance
- Feet Position: Your feet should be about as wide as your shoulders. This gives you a stable base.
- Body Ready: Stand tall but not stiff. Be ready to move down quickly.
Squat Phase
- Lowering: Bend at your hips and knees. Lower your body like you are sitting in a chair.
- Back: Keep your back straight. Do not let it round over.
- Hands: Place your hands flat on the floor. Put them just next to or slightly in front of your feet. Your whole hand should touch the ground. This supports your next move.
The Kick Back (or Step Back)
- Movement: This is a fast move. Kick or step your feet back to land in a plank.
- Landing: Your body should be straight. Your hips should not sag down. They should not stick up high. Your body forms a straight line.
- Hands and Shoulders: Your hands should be right under your shoulders. Your fingers point forward. This is key for a strong plank.
- Core Tightness: Pull your belly button towards your spine. This keeps your core strong. It protects your lower back.
The Push-up (If Included)
- Body Line: Keep your body straight. Don’t let your hips drop before your chest.
- Elbows: Lower your chest towards the floor. Bend your elbows. Keep them close to your body. Don’t let them flare out wide.
- Depth: Go as low as you can with good form. Ideally, your chest touches or comes close to the floor.
- Pushing Up: Push back up using your chest, shoulders, and arms. Go back to the strong plank position.
The Jump Forward (or Step Forward)
- Movement: Jump or step your feet back towards your hands.
- Landing: Try to land your feet near your hands. You should be back in the squat position. Your feet should be flat on the floor.
- Weight: Put your weight on your feet, not just your hands. Be ready to stand up.
The Stand Up (or Jump Up)
- From Squat: Push through your feet to stand up tall.
- Jump: If jumping, push off the ground with your feet. Jump straight up. Reach your arms over your head. This adds power and works more muscles.
- Landing: Land softly. Bend your knees slightly as you land. This takes stress off your joints. Get ready for the next burpee.
Common Mistakes and How to Fix Them
Knowing common errors helps you use proper burpee form.
* Sagging Hips in Plank: Your hips drop too low. This puts stress on your lower back. Fix: Tighten your core and glute muscles. Keep your body in a straight line.
* Hips Too High in Plank: Your butt is in the air. This means you are not using your core fully. Fix: Lower your hips until your body is straight. Hands under shoulders.
* Rounding the Back in Squat: Your back curves when you squat down or come up. Fix: Keep your back straight. Hinge at your hips. Think of pushing your butt back slightly.
* Hands Too Far Ahead: You place your hands too far in front of your body in the squat. Fix: Put your hands close to your feet, just inside or beside them. This makes the kick back and jump forward easier.
* Landing Hard on Joints: Jumping up and landing stiff-legged. Fix: Bend your knees as you land. Land softly like a cat. This protects your knees and ankles.
* Not Going All the Way Down/Up: Cutting the range of motion short. Fix: Go through the full steps. Squat low, get into a good plank, jump or stand fully up.
By paying attention to these details, you improve your burpee technique. Good form is the base for getting strong and fit with burpees.
Deciphering Burpee Workout Benefits
Why do people do burpees? They are hard! But they offer many rewards for your body. They are known for great burpee workout benefits.
- Full Body Workout: This is a major benefit. Burpees work almost every main muscle group. They work your legs, hips, butt, core, chest, shoulders, and arms. This makes them very efficient. One exercise works your whole body. This is great if you have little time.
- Builds Strength: Moving your body weight through these steps builds strength. The squat works your legs. The plank and push-up work your upper body and core. The jump adds power.
- Boosts Cardio Fitness: Burpees raise your heart rate fast. Doing a few in a row gets you breathing hard. This improves your heart and lung health. They are excellent for improving endurance.
- Burns Lots of Calories: Because they use many muscles and raise your heart rate high, burpees burn a lot of calories in a short time. They are very effective for weight loss or keeping weight off.
- Improves Coordination and Balance: Moving through the different stages requires coordination. Jumping back and forward, landing softly – these all help improve how your body moves together.
- Great for HIIT: Burpees are perfect for High-Intensity Interval Training (HIIT). You can do them fast for a short burst, rest, and repeat. This type of training is very effective for fitness.
- No Equipment Needed: You only need your body. This makes them a perfect bodyweight exercise for home, hotel, park, or anywhere.
- Increases Power: The jump phase builds explosive power in your legs and hips. This is useful for many sports and daily activities.
Doing burpees regularly can make a big difference in your fitness level. They offer a powerful way to get stronger and improve your heart health at the same time.
Interpreting Muscles Worked Burpees Target
As a full body workout, burpees work a wide range of muscles. Knowing which muscles worked burpees target helps you understand why they are so effective.
- Legs:
- Quadriceps: These are the muscles on the front of your thighs. They work hard when you squat down and stand/jump up.
- Hamstrings: The muscles on the back of your thighs. They help with the squat and pushing off the ground.
- Glutes: Your butt muscles. They are engaged during the squat, jump, and helping keep your body straight in the plank.
- Core:
- Abdominals (Abs): These muscles in your stomach work constantly. They stabilize your body in the plank position. They help control the movement when jumping feet back and forward.
- Obliques: Side abdominal muscles. They help stabilize your core.
- Lower Back: These muscles support your spine and help keep a straight line in the plank.
- Upper Body:
- Chest (Pectorals): If you do the push-up, your chest muscles work to lower and lift your body.
- Shoulders (Deltoids): Your shoulder muscles are used to hold the plank position and during the push-up.
- Triceps: The muscles on the back of your upper arms. They work during the push-up phase to extend your elbows.
- Biceps: The muscles on the front of your upper arms. They act as stabilizers.
- Upper Back: Muscles like the Rhomboids and Traps help keep your shoulders stable in the plank.
Here’s a simple table showing the main muscles worked:
| Body Part | Key Muscles | Main Actions in Burpee |
|---|---|---|
| Legs | Quads, Hamstrings, Glutes, Calves | Squat, Jump, Standing, Kick Back/Forward |
| Core | Abs, Obliques, Lower Back | Plank stability, Movement control |
| Chest | Pectorals | Push-up |
| Arms | Triceps, Biceps | Push-up, Stabilizing in Plank |
| Shoulders | Deltoids | Holding Plank, Push-up, Arm swing for jump |
| Back | Upper Back (Traps, Rhomboids), Lower Back | Plank stability |
Doing burpees means you are using almost your entire muscular system. This makes them very effective for building overall functional strength.
Comprehending Beginner Burpee Modifications
Burpees can be hard, especially when you are new to exercise. Don’t worry! There are many ways to make a burpee easier. These beginner burpee modifications let you build strength and get used to the movement before doing the full version.
- Skip the Push-up: This is the most common modification. Do the burpee steps, but when you get to the plank position (Step 3), just hold it briefly instead of doing a push-up. Then go straight to Step 5 (jumping feet forward).
- Step Back and Step Forward (Instead of Jump): Instead of jumping your feet back to the plank and jumping them forward to the squat, step them one foot at a time.
- From the squat, put hands on the floor. Step your right foot back to plank. Then step your left foot back to plank.
- Hold the plank briefly (maybe add the push-up here if you skipped it in the full version).
- Step your right foot forward towards your hands. Then step your left foot forward.
- Stand up.
This makes the movement less explosive and easier to control. It’s a great way to build strength for the jump.
- Hands on an Elevated Surface: If getting all the way to the floor is too hard, put your hands on a sturdy bench, chair, or step.
- Stand facing the bench.
- Put your hands on the bench.
- Step or jump your feet back to a plank position with your hands on the bench. (This is an incline plank).
- (Optional push-up against the bench).
- Step or jump your feet forward back towards the bench.
- Stand up.
This reduces how far you have to go down and makes the plank and push-up easier.
- Just Squat to Plank: Skip the jump up at the end. Do all the steps (maybe using stepping feet back/forward), but simply stand up tall at the end instead of jumping.
- Combine Modifications: You can use more than one modification at a time. For example, do the step-back/step-forward version with your hands on an elevated surface and no push-up.
- Focus on One Part: Practice just doing squat to plank and back. Or practice just doing squat to stand with a jump. Break down the move and work on parts you find hard.
Here is a table of beginner modifications:
| Modification | How to Do It | Benefit |
|---|---|---|
| Skip Push-up | Go to plank, then immediately jump/step feet forward. | Makes it less demanding on chest/arms. |
| Step Back/Forward | Step feet one at a time to plank and back to squat. | Reduces impact, less explosive. Builds controlled strength. |
| Elevated Hands | Place hands on bench/chair for plank/push-up. | Reduces range of motion, easier on joints/strength. |
| Skip Jump Up | Simply stand up tall at the end. | Less explosive, reduces impact, focuses on lower body. |
| Elevated Hands + Step | Hands on bench + step feet back/forward. | Easiest version, reduces stress and builds basic form. |
Start with the modification that feels right for you. As you get stronger, you can make it harder. Slowly add parts of the full burpee back in. For example, start with Step + Elevated Hands + No Push-up + Stand. Then maybe try Step + Floor + No Push-up + Stand. Then Step + Floor + Push-up + Stand. Finally, Step + Floor + Push-up + Jump or Jump + Floor + Push-up + Jump. Progress at your own pace. Beginner burpee modifications are key to building confidence and strength safely.
Exploring Burpee Variations
Once you master the basic burpee, you can try variations. Burpee variations make the exercise harder. They can also target different muscles more. They keep your workouts fresh and challenging.
- Push-up Burpee: This is often considered the standard, but the simplest burpee doesn’t always include it. Add a full push-up when you are in the plank position (Step 4). Make sure your chest goes close to the floor with good form.
- Jump Burpee: Again, often standard, but the simplest form might just involve standing up. Add a big jump straight up at the end, reaching your arms overhead (Step 6). Land softly.
- Box Jump Burpee: Instead of jumping up, jump onto a sturdy box or platform. Do the burpee steps. When you stand up from the squat, jump explosively onto the box. Step or jump back down carefully. This requires more power and balance. Start with a low box.
- Side Burpee: Instead of jumping or stepping your feet straight back, jump them to the side. From the squat, place hands down, jump feet back and to the right into a side plank position (or regular plank but feet shifted right). Jump feet back forward. Repeat, jumping feet back to the left. This works your oblique muscles more.
- One-Arm Burpee: (Advanced!) Do the burpee using only one arm planted on the ground. The other arm is kept behind your back or to the side. This is much harder on your core, shoulder, and balance. Start by practicing the plank and push-up phases on one arm first.
- Adding Weight: Hold dumbbells in your hands throughout the movement (be careful in the plank and jump phases). Or wear a weight vest. This makes the strength and cardio parts harder.
- Tuck Jump Burpee: Instead of a straight jump up, pull your knees up towards your chest in the air (a tuck jump).
- Broad Jump Burpee: Instead of jumping straight up, jump forward as far as you can. Then drop down into the burpee. This adds a horizontal power element.
Here are some burpee variations:
| Variation | How it Changes the Basic Burpee | Key Benefit | Difficulty |
|---|---|---|---|
| Push-up Burpee | Add a push-up in the plank phase. | More upper body strength (chest, triceps). | Medium |
| Jump Burpee | Add a jump straight up at the end. | More power, more cardio. | Medium |
| Box Jump Burpee | Jump onto a box instead of straight up. | More power, balance, height challenge. | Hard |
| Side Burpee | Jump/step feet to the side for plank. | Works obliques more. | Medium |
| One-Arm Burpee | Use only one arm on the ground. | High core, shoulder, and balance challenge. | Very Hard |
| Weighted Burpee | Hold weights or wear a vest. | Increases strength and cardio demand. | Hard |
| Tuck Jump Burpee | Do a tuck jump (knees to chest) instead of regular jump. | Increases cardio, agility, and lower body power. | Hard |
| Broad Jump Burpee | Jump forward before doing the burpee. | Adds horizontal power and dynamic movement. | Hard |
Choose variations that match your fitness level and goals. Always focus on maintaining good form first. Burpee variations keep your full body workout challenging.
Integrating Burpees into Your Fitness Plan
Burpees are versatile. You can use them in many types of workouts. They fit well into a calisthenics routine because they use just your body weight. They are also a staple in HIIT exercises.
- As a Warm-up: A few slow burpees (maybe a modified version) can be part of your warm-up routine. They get your blood flowing and warm up many joints and muscles.
- In HIIT Workouts: Do burpees for a short burst (like 30-60 seconds) followed by a short rest (like 30-60 seconds). Repeat this cycle several times. This is a very effective HIIT method for burning fat and improving cardio.
- As a Finisher: At the end of your workout, do a set of burpees to fully exhaust your muscles and lungs.
- In a Circuit: Put burpees together with other exercises like squats, lunges, push-ups, and planks. Do each exercise for a set time or number of reps, then move to the next with little rest. Repeat the circuit. Burpees make a great station in a circuit.
- Stand-Alone Challenge: Set a goal to do a certain number of burpees in a row, or a total number in a day or week. Or try timed challenges, like “How many burpees can I do in 5 minutes?”
- Calisthenics Routine: Burpees are a core bodyweight exercise. Include them with pull-ups, dips, push-ups, and core work for a complete calisthenics program. They provide the crucial “down-up” dynamic movement missing in many static calisthenics moves.
When adding burpees, start small. Do a few at a time. Focus on proper burpee form over speed. As you get fitter, you can do more burpees or do them faster. Listen to your body. If something hurts, stop. Rest is important too. Don’t do hard burpee workouts every single day. Give your muscles time to recover.
Building a Calisthenics Routine with Burpees
A calisthenics routine uses your body weight for resistance. Burpees fit perfectly into this. They work many muscles. They also get your heart rate up.
A simple calisthenics routine could look like this:
- Warm-up: 5-10 minutes of light movement (jogging in place, arm circles, leg swings).
- Workout:
- Push-ups (on knees or toes) – 3 sets of 10-15 reps
- Squats (bodyweight) – 3 sets of 15-20 reps
- Plank – 3 sets, hold for 30-60 seconds
- Burpees – 3 sets of 8-12 reps (use modifications if needed)
- Lunges (alternating legs) – 3 sets of 10-12 reps per leg
- Cool-down: 5-10 minutes of stretching.
As you get stronger, you can increase the reps, sets, or try harder burpee variations. You can also add other exercises like pull-ups (if you have a bar), dips, or different core exercises. Burpees provide the explosive, dynamic part of the workout in this type of routine. They make it a truly full body workout.
Safety and Tips for Doing Burpees
To get the most burpee workout benefits safely, keep these tips in mind:
- Warm Up First: Always do a few minutes of light exercise before starting burpees. This prepares your muscles and joints.
- Start Slow: Don’t try to do too many too fast when you begin. Focus on doing each one correctly. Speed comes later.
- Listen to Your Body: If you feel sharp pain, stop. It’s okay to take breaks.
- Use Modifications: There is no shame in using beginner burpee modifications. They help you build strength safely. Progress when you feel ready.
- Proper Breathing: Don’t hold your breath. Breathe out as you go down, breathe in as you come up.
- Soft Landings: When jumping (either back to plank or jumping up), try to land softly. This protects your joints.
- Hydrate: Drink water before, during, and after your workout.
- Use Good Shoes: Wear athletic shoes that give you good grip and support.
- Clear Space: Make sure you have enough room around you to move freely without hitting anything.
- Consistency: Doing burpees a few times a week is better than doing a lot once in a while. Regular practice improves your form and fitness.
Frequently Asked Questions About Burpees
Many people have questions about burpees. Here are some common ones:
h4 What is a Burpee Called?
It’s simply called a burpee. The exercise is named after physiologist Royal H. Burpee, who invented it in the 1930s as part of a fitness test.
h4 Are Burpees Good for Losing Weight?
Yes, burpees are excellent for losing weight. They are a high-intensity exercise that burns a lot of calories. They work many muscles, which also helps boost your metabolism. Doing them as part of a regular routine and healthy diet is very effective for weight loss.
h4 How Many Burpees Should a Beginner Do?
A beginner might start with just 3-5 burpees at a time. Focus on doing them with good form using modifications. You can do a few sets with rest in between. As you get fitter, you can slowly increase the number of burpees you do in a set or the total number in your workout.
h4 Do Burpees Build Muscle?
Yes, burpees build muscle. They work muscles in your legs, hips, core, chest, shoulders, and arms. While they may not build huge muscles like heavy weightlifting, they build functional strength and muscle endurance across your entire body. Including a push-up in the burpee works your upper body muscles more.
h4 Are Burpees Bad for Your Knees?
Burpees can be hard on your knees if you have existing knee problems or if you use poor form. Landing stiff-legged from the jump can stress your knees. Using beginner burpee modifications like stepping back/forward or skipping the jump can make them easier on the knees. Focusing on soft landings by bending your knees slightly as you land is also key for protecting your knees. If you have knee pain, talk to a doctor or physical therapist before doing burpees.
h4 How Often Should I Do Burpees?
The best frequency depends on your fitness level and overall workout plan. If you’re a beginner, start with 2-3 times per week with rest days in between. If you’re more advanced and using them in HIIT or circuit training, you might do them 3-4 times a week as part of different workouts. Avoid doing intense burpee sessions every single day to allow your body to recover.
h4 Can I Do Burpees if I Can’t Do a Push-up?
Absolutely! You can do beginner burpee modifications that skip the push-up entirely. You can also do the push-up on your knees or against an elevated surface (like a bench) within the burpee sequence. Start where you are and build up strength.
h4 Is a Burpee a Cardio or Strength Exercise?
A burpee is both! It’s a fantastic example of a compound exercise that provides benefits for both cardio and strength. The fast movement and jumping raise your heart rate significantly, making it great cardio. The act of squatting, going into a plank, and pushing up/standing up builds strength using your body weight. It’s a true full body workout.
Conclusion
Learning how to do a burpee exercise correctly is a worthwhile fitness goal. They are a powerful full body workout, a key bodyweight exercise, and a staple in HIIT exercises and calisthenics routine plans. By mastering proper burpee form and burpee technique, understanding the muscles worked burpees target, and knowing beginner burpee modifications and burpee variations, you can effectively use this single move to boost your strength, cardio, and overall fitness. Start simple, focus on form, and build up from there. Happy burpee-ing!